• Home
  • Blog
  • Creative Links
Ochre Pome: Modern Crochet

Mikaia's Owl Scarf Pattern

1/25/2016

6 Comments

 
Picture
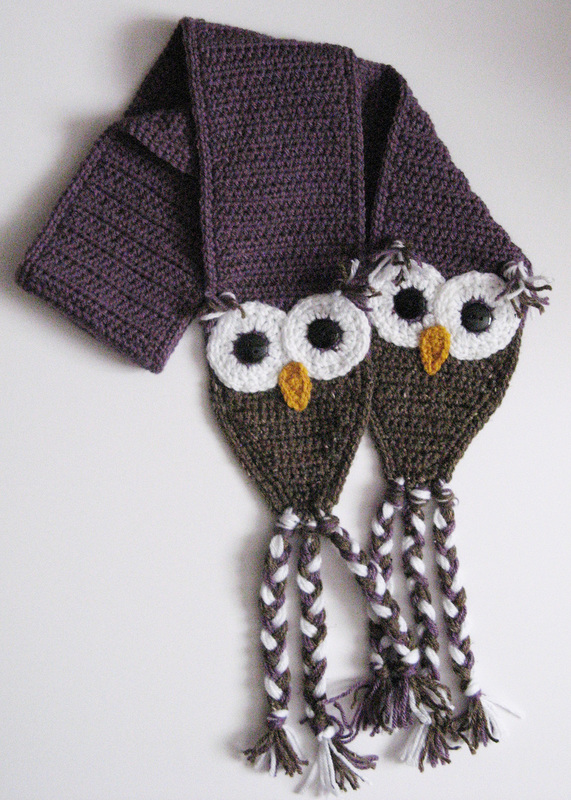
Many fellow Ravelry crochet buffs should be familiar with the pattern this scarf is based upon, none other than RepeatCrafterMe's Owl Hat pattern.

  • Yarn: Vanna's Choice (4). Barely, White and Dusty Purple
  • Hooks: G, H, J
  • Pattern is in American terms
  • Stitches used: single crochet (sc), half-double crochet (hdc), slip stitch (sl st), chain (ch)
  • Scarf dimensions: 54" long x 5" wide
  • 3/4 inch black buttons

Scarf:
With G hook and Barely, Chain 5
1. Sc in second chain from hook. And in remaining chains. Ch 1. Turn. (4 sc)
2. Sc in each sc. Ch 1. Turn (4sc)
3. Sc in next 3 sc, inc.  Ch 1. Turn. (5 sc)
4. Sc in each sc. Ch 1. Turn. (5 sc)
5-22. Continue in this method until you have 15 sc across.

23-26. Hdc in each stitch across. Ch 2. Turn (15 hdc)
27. Switch to Dusty Purple. Hdc in each stitch across and continue until you
scarf measures 41 inches.

Decrease
1. Sc in each hdc across.
2. Sc in next 13 sc, decrease. Ch 1. Turn. (14 hdc)
3. Sc in each sc across. Ch 1. Turn (14 hdc)
4. Sc in next 11 sc, decrease. Ch 1. Turn (13 hdc)
5. Sc in each sc across. Ch 1. Turn (13 hdc)
Continue in the method until you have 4 sc across.

Do not fasten off, but using Barley and J hook, create a sc border around scarf switching to dusty purple and then back to Barley as appropriate. Two rows.

Owl eyes and beak.
For eyes use RepeatCrafterMe Owl eyes small using H hook.
For beak use RepeatCrafterMe beak size medium using G hook. But add a sc edge to beak.

Cut 18 strands of each color in desired length for braided tail. Use 3 strands per tail of each color to create braid. For ear tufts cut 8 strands of each color in desired length. Use 2 strands of each color per ear tuft.
6 Comments

ok Halloween is over

11/5/2015

0 Comments

 
Ha! yeah, its way over. Time to get serious about the upcoming holidays and events, which are many. Lots happening over here. I'm trying really hard not to go into psycho mode and be running around.

Lets see:
  1. I decided to finally get certified yoga level 1
  2. I have two requests for pieces. yay!
  3. I have a date for a photo shoot in January for my stuff. Very exciting
  4. And lastly waiting, waiting to hear about that craft fair.

Well actually there is more to that little list than I listed. Each one has about 20 steps to each but I'll get there.

Hope to have a new pattern to post soon and some fun photos of the latest and greatest I have been making.

OchrePome
0 Comments

Baby Newsboy Hat

10/14/2015

8 Comments

 
Picture
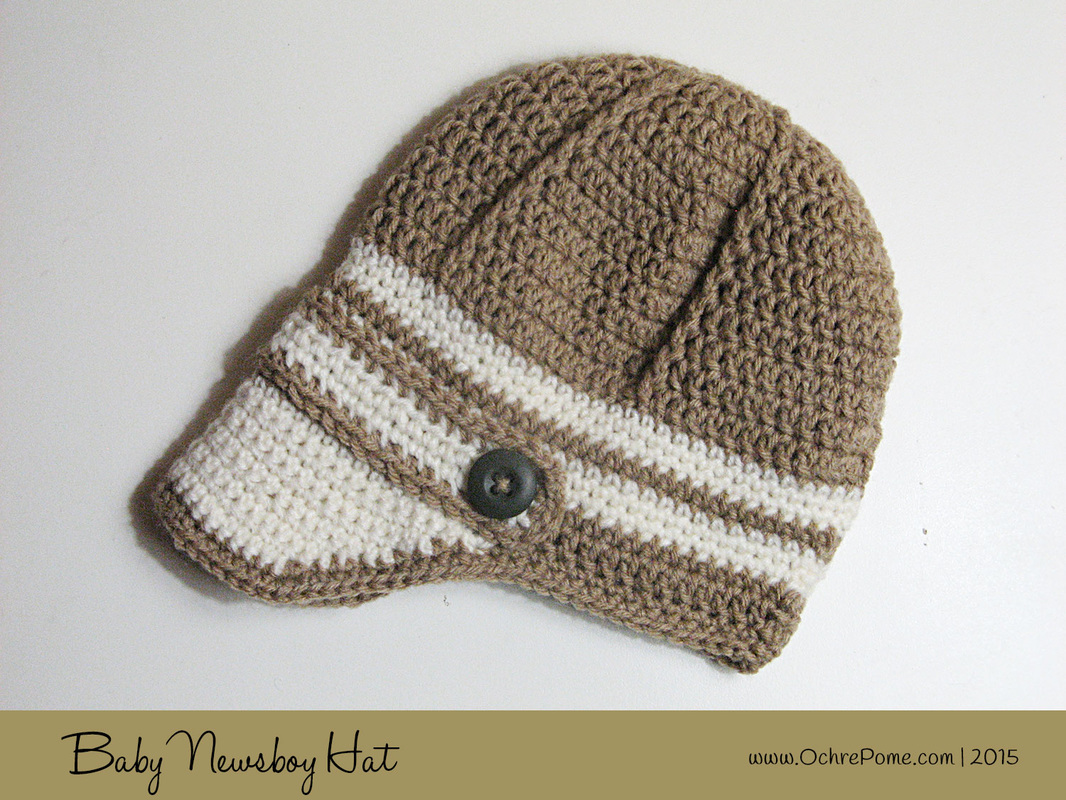
Yarn: Baby Bee, Sweet Delight, Hobby Lobby
Color 1: Teddy
Color 2: Naked
Weight: Light (3)
Hook size: G (4.0 mm)

Stitches Used: (American)
Slip Stitch (sl st)
Single crochet (sc)
Double crochet (dc)
Front Post Double Crochet (fpdc)
Single crochet 2 stitches together (Sc2tog)

Worked from top down
Beginning ch of every rnd is counted as a st.

The Crown:

With color 1 make a Magic Circle
  • Row 1: ch 2, work 14 dc into ring, sl st to join into the top of the ch 2 (15 st’s)

Increase rounds:
  • Row 2: ch 2, work 1 dc in same st as the ch 2, work 2 dc’s into the next dc, work a fpdc around the post of the next dc, *work 2 dc’s into each of the next 2 dc’s, work a fpdc around the post of the next dc,* repeat from*to* to end of the round, sl st to join into the top of the ch 2 (25 st’s)
  • Row 3: ch 2, work 2 dc’s in next dc, work 1 dc in next dc, work 2 dc‘s in next dc, work fpdc , *work 1 dc into next dc, work 2 dc’s in next dc, work 1 dc into next dc, work 2 dc‘s in next dc, work fpdc * repeat from*to* to end of the round, sl st to join into the top of the ch 2 (35 st’s)
  • Row 4: ch 2, work 1 dc in next dc, work 2 dc’s in next dc, work 1 dc in next 2 dc‘s, work 2 dc‘s in next dc, work fpdc, *work 1 dc in next 2 dc‘s, work 2 dc’s in next dc, work 1 dc in next 2 dc‘s, work 2 dc’s in next dc, work fpdc,* repeat from*to* to end of the round, sl st to join into the top of the ch 2 (45 st’s)
  • Row 5: ch 2, work 1 dc in next 2 dc’s, work 2 dc’s into next dc, work 1 dc in next 3 dc‘s, work fpdc, *work 1 dc in next 3 dc’s, work 2 dc’s in next dc, 1 dc in next 3 dc’s, work 2 dc’s in next dc, work fpdc,* repeat from*to* to end of the round, sl st to join into the top of the ch 2 (55 st’s)
  • Row 6: ch 2, work 1 dc in next 3 dc’s, work 2 dc’s into next dc, work 1 dc in next 4 dc‘s, work fpdc, *work 1 dc in next 4 dc’s, work 2 dc’s in next dc, 1 dc in next 4 dc’s, work 2 dc’s in next dc, work fpdc,* repeat from*to* to end of the round, sl st to join into the top of the ch 2 (65 st’s)

End increase rounds
  • Rows 7-12: ch 2, work 1 dc in next 11 dc’s, work fpdc, *work 1 dc in next 12 dc’s, work fpdc,* repeat from*to* to end of the round, sl st to join into the top of the ch 2 (65 st’s)
  • Row 13-15: (color 2): ch 1, work 1 sc in next 65 st’s.
  • Row 16 (color 1): ch 2, work 1 hdc in next 65 st’s.
  • Row 17-19: (color 2): ch 1, work 1 sc in next 65 st’s.
  • Row 20 (color 1): ch 2, work 1 hdc in next 65 st’s.
  • Row 21 (color 1): ch 2, work 1 dc in next 65 st’s.
  • Row 22: (color 1): ch 1, work 1 sc in next 65 st’s.

Join with Sl st to 1st ch. Don’t tie off yarn.

Hat Brim
With color 2, join yarn 16 st’s from last row join.
  • Row 1: ch 1, skip next sc, 1 sc in next 4 sc, 2 sc in next sc, 1 sc in next 19 sc, 2 sc in next sc, 1 sc in next 4 sc, sc2tog, 1 sc in next sc
  • Row 2: Turn, Sl st to next sc, ch 1, sc in same st., 1 sc in next 32 sc
  • Row 3: Turn, ch 1, skip next sc, 1 sc in next 4 sc, 2 sc in next sc, 1 sc in next 18 sc, 2 sc in next sc, 1 sc in next 4 sc. Sc2tog, sc in next sc
  • Row 5: Turn, Sl st to next sc, ch 1, sc in same st., 1 sc in next 30 sc
  • Row 6: Turn, ch 1, skip next sc, 1 sc in next 4 sc, 2 sc in next sc, 1 sc in next 17 sc, 2 sc in next sc, 1 sc in next 4 sc. Sc2tog, sc in next sc
  • Row 7: Turn, Sl st to next sc, ch 1, sc in same st., 1 sc in next 28 sc
  • Row 8: Turn, ch 1, skip next sc, 1 sc in next 4 sc, 2 sc in next sc, 1 sc in next 16 sc, 2 sc in next sc, 1 sc in next 4 sc. Sc2tog, sc in next sc
  • Row 9: Turn, Sl st to next sc, ch 1, sc in same st., 1 sc in next 25 sc
  • Row 10: Turn, Sl st to next sc, ch 1, sc in same st., 1 sc in next 24 sc
  • Row 11: Turn, Sl st to next sc, ch 1, sc in same st., 1 sc in next 23 sc

Hat Trim
Return to Hat row 22.
  • Row 23: Pick up loop of sl st, ch 1, 1 sc in st around including hat brim, 3 sc in brim corner, sl st to top of ch 1
  • Row 24: 1 sc in exh sc around, 3 sc in brim corners, sl st to ch 1.

Fasten off.

Strap
Ch 38 with color 1
  • Row 1: 1 sc in 2nd ch, 1 sc in next 36 sc
  • Row 2-3: Ch 1, turn, sc in 37 sc
  • Row 4 (color 2): Join color 2, ch 1, sc in next 36 sc, 2 sc in next sc, continue along edge 1 sc in ech row. Work 2 sc in corner stitch. Working bottom of foundation chain, 1 sc in each chain loop, 2 sc in corner of chain, continue along edge 1 sc in each row. 1 sc in first sc, join with sl st.

Fasten off.

Sew strap just above hat brim. Attach 2 buttons to each end of hat strap.


8 Comments

Chunky Baby Beanie

10/14/2015

2 Comments

 
Picture
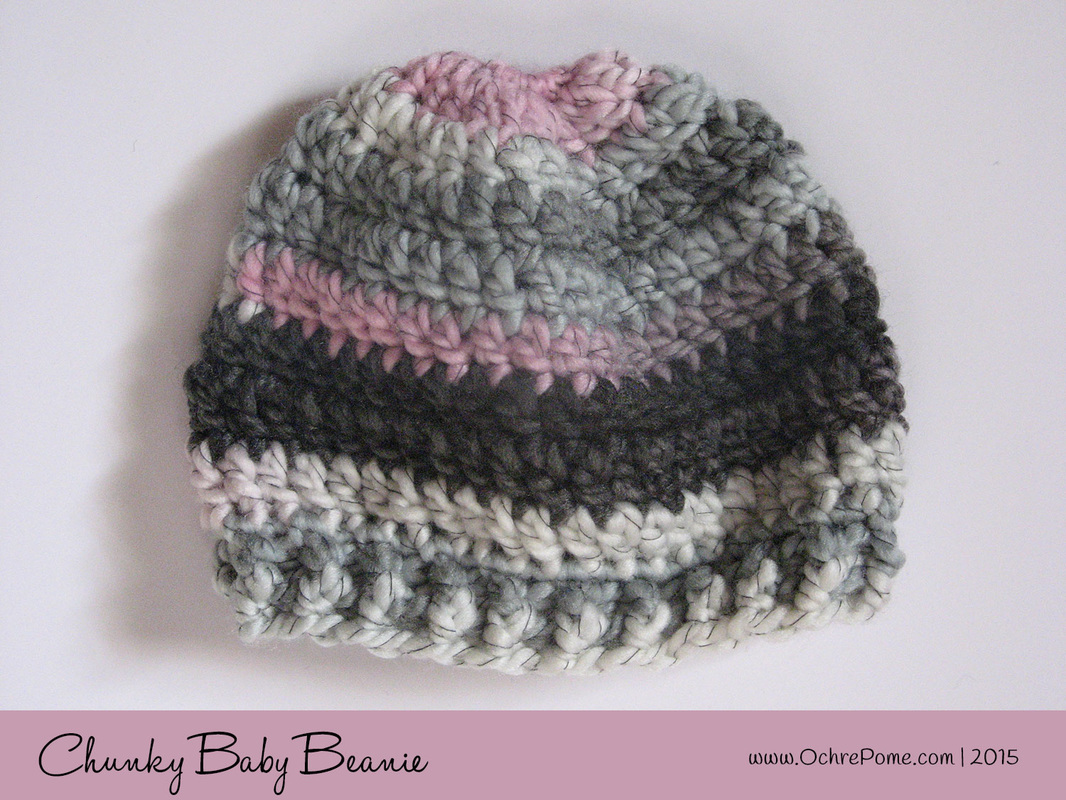
Let's face it, I'm on a roll and since I have this pattern hiding on an unpublished page from the old site, I thought I'd bring it back.

Free! Enjoy. 

Yarn: Yarn Bee, First Love, Hobby Lobby
Weight: Bulky (5)
Hook size: J (6.0 mm)

Stitches Used: (American)
Slip Stitch (sl st)
Single crochet (sc)
Double crochet (dc)
Front Post Half-double Crochet (fphdc)
Back Post Half-double Crochet (bphdc)

First chain in each round does not count as a stitch
Crochet in rounds

Pattern:
  • ​Row 1: Chain 2
  • Row 2: 12 sc in second chain from hook, join with sl st. (12 sc)
  • ​Row 3: Chain 2, 2 dc in each stitch around, join with sl st to first dc. (24 dc)
  • Row 4: Chain 2, *1 dc in next stitch, 2 dc in next stitch* repeat until end, join with sl st to first dc. (36 dc)
  • Row 5: Chain 2, *1 dc in next 3 stitches, 2 dc in next stitch* repeat until end,  1 dc in last stitch, join with sl st to first dc.  (45 dc)
  • Row 6-10: Chain 2, 1 dc in each stitch around, jin with slip st to first dc. (45 dc)
  • Row 11: Chain 1, 1 sc in each stitch around, join with sl st to first sc. (45 sc)
  • Row 12-13: Chain 2, *fphdc in next stitch, bphdc in next stitch* repeat until end, join with sl st to first fphdc. (23 fphdc, 22 bphdc)

Weave in ends
2 Comments

Trellis Headband

10/14/2015

7 Comments

 
Picture
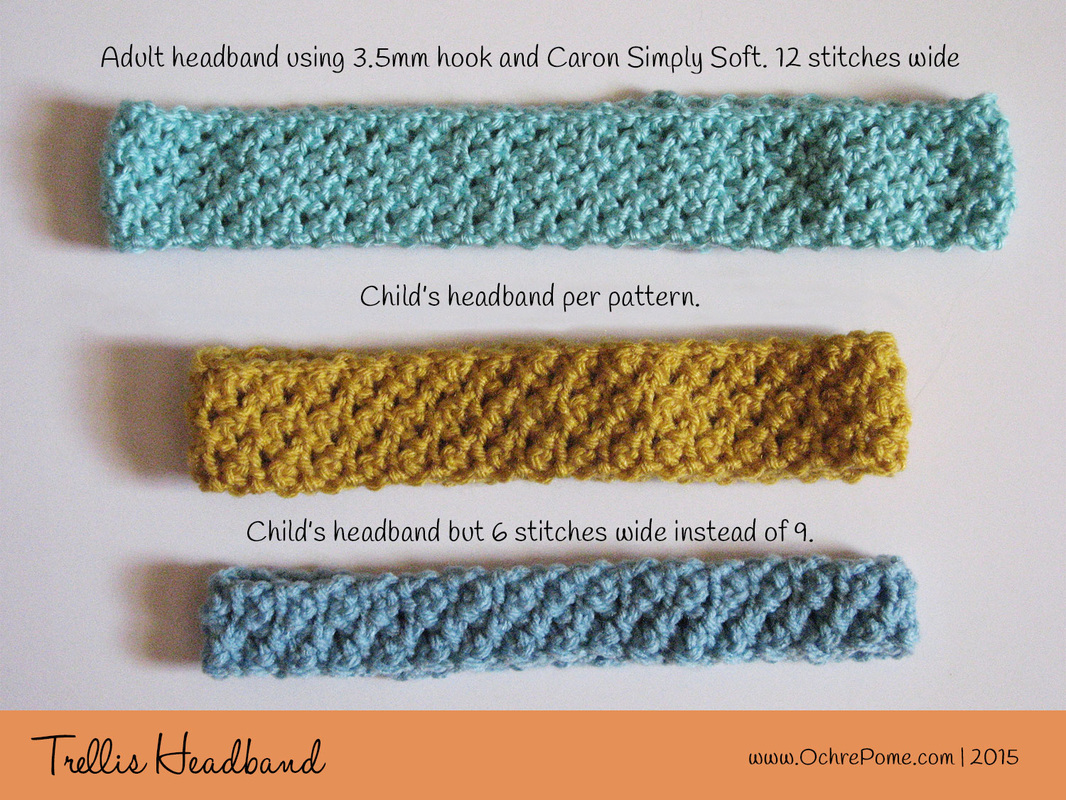
A pattern. Say it ain't so. Well it is. I am making crochet headbands for the upcoming craft fair and through some modification I came up with this simple pattern. It's lovely. You can use any size hook, any weight yarn, any width just do the chains in multiples of threes.

For the photo pattern
Hook F (3.75 mm)
Vanna's Choice (#4 worsted weight)

Chain 9
  • R1: Slip stitch into 3rd chain from hook. Chain 3. Skip 2 stitches and slip stitch into 3rd stitch. Chain 3. Skip 2 stitches. Slip stitch into last chain. Should be 3 loops. Chain 3. Turn.
  • R2: Slip stitch into 2nd chain of each loop. Chain 3. Turn.
  • Repeat R2 until you reach the desired length.
  • Whip stitch the ends together. Weave in yarn.

That's it. A very simple but versatile headband. It also has a nice stretch to it for fitting snugly to your head.

Since I really hate it when a pattern maker says make length to fit whomever's head it's being made for, I am adding this link from Bev's Country Cottage for average head sizes for all ages. Thank you Bev! You're a lifesaver.

Bev's Size Chart for Hats and Headbands

Oh. Pattern is free. Make it, sell it, go mad! :-)
7 Comments

    Author

    Crochet lover. Ghost hunter. Avid chocolate eater. Kitties welcome. Maker of all things art.
    And on the side graphic designer. :-)

    Picture

    Archives

    January 2016
    December 2015
    November 2015
    October 2015
    September 2015

    Categories

    All
    #3 Light Weight
    Baby
    Ballgrowns
    Bulky Yarn
    Cozy
    Craft Fairs
    Hats
    Headband
    Hood
    Kitties
    Newsboy
    Owl
    Pattern
    Pixie Hat
    Scarf
    Softies
    Toddler
    Willow
    Worsted

    RSS Feed

Picture

Crochet for your heart's desire.

Picture
Created by Albrecht Design